The final administrative-type step that you perform is to locally set up the MUDE. The administrator must identify or create a shared network directory that all developers can access. Then, the administrator copies the appropriate repository files to that location. Typically, this directory is a shared network directory and contains copies of master repositories that multiple developers access during check in and checkout. Developers create a pointer to this directory when they set up the Administration Tool on their own machines. This directory must be accessible to all developers and repository servers. Note: The administrator must set up a separate, shared network directory that is dedicated to multiuser development. If it is not set up and used as specified, critical repository files can be unintentionally overwritten and repository data can be lost. In this OBE, the shared directory is a local directory, <drive>:RPD. To set up a multiuser development directory and copy the appropriate repository file, perform the following steps: 1 . Navigate to a local drive and create a new directory named RPD (for example, c:RPD).

2 . Right-click RPD and select Properties from the shortcut menu.

Desired to gain proficiency on OBIEE Training? Explore the blog post on OBIEE training to become a pro in "OBIEE Training Online"
3 . In the RPD Properties dialog box, click the Sharing tab. Select Share this folder and click Permissions.

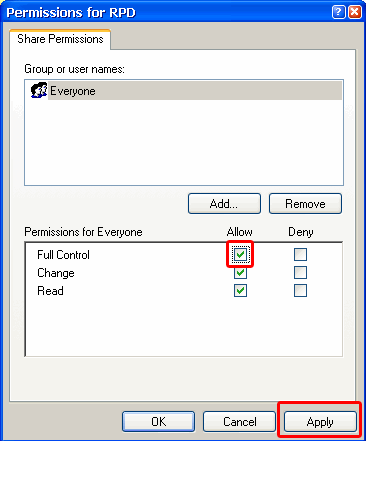
4 . In the "Permission for RPD" dialog box, select the Full Control checkbox and click Apply.

Note: For this tutorial only, full control is being granted. Normally you would only grant full control permissions to those people who require access to the RPD. 5 . Click OK > OK. You have shared your directory that will house the repository.
6 . Next, copy the most current offline version of the SampleApp repository that will be modified in the MUDE. Navigate to <ORACLE_INSTANCE>bifoundationOracleBIServerComponentcoreappplication_obips1repository (for example, c:bi11ginstancesinstance3bifoundationOracleBIServerComponentcoreappplication_obips1repository) and select the highest version of the SampleApp repository.

7 . Copy and paste the repository file into the <drive>:RPD directory (for example, c:RPD).

8 . Right-click the repository file and rename the file SharedMaster.rpd. This is the dedicated multiuser development repository that will be modified and merged back into the master repository. This repository contains the user projects as well.

You have completed the administrative tasks.
For an in-depth understanding of OBIEE click on
You liked the article?
Like: 0
Vote for difficulty
Current difficulty (Avg): Medium

TekSlate is the best online training provider in delivering world-class IT skills to individuals and corporates from all parts of the globe. We are proven experts in accumulating every need of an IT skills upgrade aspirant and have delivered excellent services. We aim to bring you all the essentials to learn and master new technologies in the market with our articles, blogs, and videos. Build your career success with us, enhancing most in-demand skills in the market.